The world of nail art is a vast platform for creative expression, and the trends are as broad as they are awesome. Nevertheless, one design that has taken the nail art world by storm is the coffin ombre nails, a chic and subtly dramatic design garden. With the lovely taper and gradual color transition, coffin ombre nails are the ultimate blend between shape and color to create a stylish all-attention-seeking arrangement.
The Ultimate Guide to Mastering Coffin Ombre Nails
If you are a nail art lover, beauty connoisseur, or merely person who loves staying in tune with the latest trends, this extensive guide is your ticket to the world of mastering coffin ombre nails. Whether it’s the iconic French streak or something inspired by a cheerful holiday spirit, we have a design garden for you below, ranging from sophistication to quirky; and all the guides, tips, and tutorials essential to nail the perfect ombre effects on coffin-shaped nails. The irresistible charm of Coffin Ombre Nails
Nevertheless, before we delve into the ultimate guide of constructing the coffin ombre nail, it is essential to comprehend what makes this design so unique. This nail trend’s square-cut that tapers to a sharp end giving it the appearance of a small coffin is sought out for edgy elegance.
At the same time, ombre gives the nail a transition appearance and a sense of depth as the colors merge from one shade to two or more shades, running from dark to light or combining several shades across the nail. Coffin ombre is ideal for offering a middle design concept that is neither too vibrant nor too dull, offering that perfect seek balance between striking and soft. Its possibilities are unlimited, with one design for every style and personality.
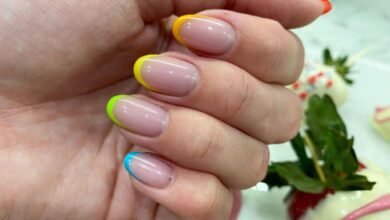
- Classic French Ombre Coffin Nails. For those who wish to go for the classic look and the epitome of sophistication, the Classic French Ombre Coffin Nails is your answer . It is a delicate ombre design that frays from nude to a translucent French-tip white, reminiscent of the natural nail. The steps to achieve this look are as follow.
- First, prepare your nails with a base coat. Next, apply nude polish that matches your skin tone. Then, sponge or brush on the white polish starting at the tip of the nail and temporally moving upward. Finally, remove the excess edges with a small brush in nail polish removed for precision and apply a top coat for a glossy finish.
- The key to achieving this look is, quite literally, blending. Using a sponge or an ombre brush ensures that the white and nude are blended in such a way that it is impossible to stop one color and find the other one. 2. Subtle Nude to White Ombre Coffin Nails. For those looking for a more subtle approach, the Subtle Nude to White Ombre is ideal.
- It is perfect for an office setting of those who prefer a minimalist approach. The steps to the looks are apply a clear base coat and a sheer nude polish. Then use an ombre brush to apply a soft white polish on the tips. Finally, blend the two to ensure a soft transition. Apply another layer of the white polish to the tip for a stronger French tip look.
Step 4: Close the look with a top coat to smooth any rough edges. This design is only a hint of contrast yet remains glossy and natural. The trick is to make the white tone so sheer that the nude base slightly peeks through for that high-class touch. Glamorous Glitter Ombre Coffin Nails For more sparkle on your style, the Glamorous Glitter Ombre Coffin Nails design will do the trick.
The glitter adds that extra element of luxury and play to the regular ombre, and you can wear this on special occasions. Below is the guide for the sparkling nails design? Step 1: Paint a transparent base coat, and then add sheer or nude as the level. Step 2: Using the makeup sponge, dab glitter polish on the tips and blend upwards. Step 3: you can keep doing the dabbing and blending on the tips to bring out more of the glitter effect.
Step 4: finally, paint the topcoat to keep the glitter in place and smooth the gradient. To ensure that the glitter flakes remain on the tip and not on the whole piece on nail, use your makeup sponge to paint and dab the glitter polish.
The final result is rich and festive and will keep all eyes on you. Vibrant Rainbow Ombre Coffin Nails The Vibrant Rainbow Ombre Coffin Nails are for those who fancy all colors. This design takes multiple bright colors across for a beautiful rainbow. Below is the guideline to create this lively tip?
Step 1: Start with a white base coat that will enhance the color. Step 2: drag the colors of the rainbow from the cuticle up to the tips in order or according to the pattern and using a small brush or ombre sponge technique.
- Blend where the shades meet the ombre effect.
- Top coat with high-gloss to seal and protect the design. This design is ‘more is more, and the color application and blending need a precision od touch. Ensure merging each shade to create a stunning, consistent ombre finish. * Muted Pastel Ombre Coffin Nails. The muted pastel ombre coffin nails exemplify a daintily romantic touch on the nails.
- This is perfect for a casual day or when donning a flowy summer dress. Here’s how to create this serene look: * Use an ombre brush to apply an even lighter pastel shade on the tips. * Reapply the base pastel as the second blend or if the previous color is too dark. * Finish with a matte top coat for the ultimate softness. The trick to winning is using colors that are nearly similar and softly blending them to create but not a color transition that is too subtle.
- * Bold Neon Ombre Coffin Nails: The bold neon ombre coffin nails display a look full of confidence and fun. They have high contrasting neon shades, bright, and bold to contradict any outfit. * Apply a white or light base coat to brighten nail color. * Use a tiny brush and apply the chosen neon polish at the end of the nail.
- Step 3: The second coat to the tip will help in intensifying neon colors while the blend is shaded upwards again.
- Step 4: To seal the already worn top surface, one should apply two or more layers of topcoat to protect and add the gleam to the nails. Neon polish is preferably somewhat clear, and has more layers that make the color to be vivid. The ombre method will make the iterated coats to be more noticeable, and one swill need to blend cautiously .
Chic Black to Grey Ombre Coffin Nails
For a different ombre style with cool factors to it, one may style their cruelly nail with Chic Black to Grey Ombre. Dark color to blend ombre is distinct, but the results are challenging to most.
- Step 1: Apply a clear base coat and medium grey colored polish for the padding.
- Step 2: Apply a black polish on tip slightly with a brush and blend discharge upwards.
- Step 3: Repeat the second step with a black layer to further match upwards and intensify the dark color.
- Step 4: Use black polish at the tip of black or sheare dark gray will provide a cool touch. The key to this shade is layers that stimulate from as light to darkness in layers. One should consider waiting for the above layer to dry before adding to avoid growing massy.
Elegant Blue to Silver Ombre Coffin Nails
The Elegant Blue to Silver Ombre Coffin Nails give cool shades and a chick look to the nails. Some pinpoint one desires winter’s night sky to echo through style, and that’s how to pull it off;
- Step 1: Apply clear basecoat and medium blue color polish as a base.
- Step 2: Use silver color polish from the tip and tenderly blend discharge upwards with an ombre brush.
The silver will be more intensified with additional dousing and blending for a more pronounced ombré. Seal it with a high-gloss top coat that will further enhance the shine and the color. This step requires dainty brush strokes to diffuse the silver towards the blue and not the other way around. This way, silver serves as a celestial complement, and the blue chords are dominant.
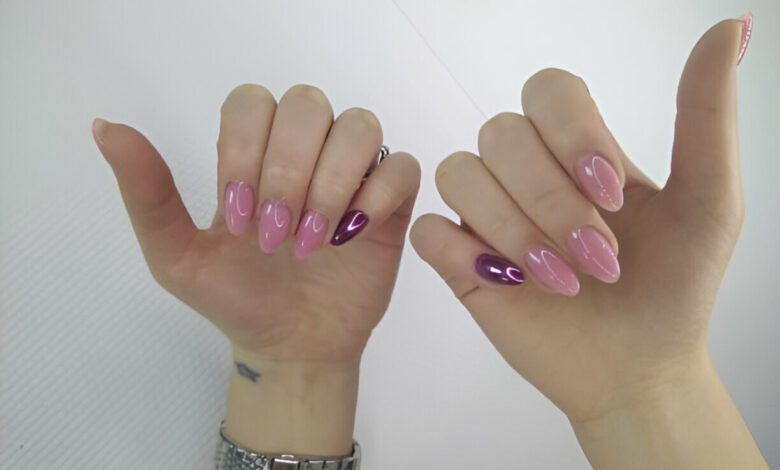
Romantic Pink to White Ombre Coffin Nails This ombre feels the most romantic. It’s a dreamy finish that surpasses a flirty yet subtle color blend and level of elegance. Round them off with pearls! Step 1 : Add a clear base coat and apply a coat of soft pink, and let it dry. Step 2: Use an ombre sponge or brush, dip it into white and coat the tips; blend upwards. Reapply a second blend of pink in between the white if needed to smoothen.
Finally, step 4 uses a pearly top coat for a nacreous finish. Make sure the white doesn’t take the stage from the pink. Mermaid-Inspired Ombre Coffin Nails Under the sea, under the sea is where your explosives! Hence, apply the mermaid-inspired ombré coffin nails and let your inner Ariel out. Step 1: Add a clear base and coat your nails with teal. Step 2: Use a sponge to coat the tips with a darker ocean blue or sea green.
If you prefer ombre nails with a hint of iridescent, try the next design: Step 3: sprinkle confetti glitter above the layer to add a touch of iridescent or mermaid scale. Step 4: apply a glossy top coat to lock in the patterns, resulting in a sheen finish that evokes a mermaid tail’s scales sparkle.
To achieve the best end result with these, it is advised to layer them gently – build up the blue or green tints gradually and sprinkle the confetti glitter liberally for a mermaid-worthy sparkle Sunset Ombre Coffin Nails Creating the heat of a magnificent sunset with the Sunset Ombre Coffin Nails. Here’s what to do to get this attractive pattern of a painted sky: Step 1: when you set a translucent base coat, apply a very light nude, or pale orange overlay.
Step 2: using an ombre brush or sponge, add the warmth of the evening sunset color to the apex and blend below. Please ensure to thoroughly blend the ‘horizon’ zone to show that the setting ball had completely descended underneath. Step 3: endorse your nails with a glossy finish that may reflect the evening sky.
The real skill in that ombre, though, is getting the blend perfect so that the colors are ardent enough to express an evening but not strong enough to smother your nail bed. Galaxy Ombre Coffin Nails Milky Way-inspired Galaxy Ombre Coffin Nails give a more mystical allure and emulate the bright hues of various galaxies against the black.
Get the hunt by: Step 1: apply black polish to a translucent base coat. Step 2: Down with shades of navy, purple, and dark blue with sponge or ombre brush in the direction of the barrier. Step 3: scrupulously apply shimmer or glitter in a circular formation or cluster all over the nails to reveal faraway astronomies. Step 4: uncertain your wonder at your nail bed’s sagacity with the help of your matt finish coat.
This nail design, by nature, is supposed to be ‘random’, a celebration of colors and decorations that are not afraid to be bright.
Floral Ombre Coffin Nails
Get a little nature in when you work with the Floral Ombre Coffin Nails. Soft flowers are a simple centerpiece on a gradient background that mirrors the color shift of the flower’s petal. Here is how you create your garden-inspired design: 1. Base: Clear base coat and a light neutral color as the base.
2. Create delicate floral patterns are drawn on top half with a thin brush. 3. Using an ombre sponge or brush, apply a contrasting color to the bottom half and then blend it up to meld naturally with the floral patterns. 4. A semi-matte top coat adds an additional vintage touch to the colorway. The key to this design is to balance the flower prints and the ombre so that neither one feels overpowering. Geode Ombre Coffin Nails
Capture the crystalline beauty of geodes with the Geode Ombre Coffin Nails. This mesmerizing design uses chalky earth tones and shimmer to bring the beautiful rock formation to your fingertips. Here’s how to create this geologically chic design: 1. Base: Base of a clear coat and a taupe or a deep purple.
2. Apply the dark jeweled tones with a thin brush or sponge and blend upward with the ombre technique.
3. Strewn in silver or gold nail foil or polish for the shiny crystalline effect.
4. Topcoat: High gloss for reflective surface of crystals The key to geode is having a slightly marbled transition from your base color to the dark, jewel tones, with the metallic as accent pieces in the ‘vein’ of the ‘rock.’
- Tropical Ombre Coffin Nails. Let tropical colors bombard your nails and turn them into an island paradise. Follow the steps given below to achieve the island vibes:
- Apply a clear base coat and a vivid tropical color of your liking. This could be ocean blue, palm leaf green, or hibiscus pink – as long as it reminds you of a summer vacation, you’re doing it right.
- Using an ombre brush, add a darker gradient of the base color to the tips and softly fade it upwards with a sponge or a brush.
- Add some motifs: maybe a faint stripe of the base color and a palm leaf or a parrot – or a cluster of coconuts, whatever takes you back to the beach.
- Finish it all off with a high-gloss top coat – your nails should look almost edible, that’s how appetizing these hues are. When it comes to tropical nails, your color choices are of the essence. These nails are meant to shine with life and energy, provided by lush gradients or a blend of the base color and its ombre.
- Autumn Ombre Coffin Nails. Alternatively, if it’s the ghost month, you can match your nails to the gold of the falling leaves and not have to leave your room at all as a horror movie plays outside. Follow these steps to achieve autumnal vibes:
- Apply a clear base coat and a less savory and more warm brown or a muted orange.
- Using a sponge, blend warmer sunset accents onto your nails, such as red, orange, or a golden shade.
- Optional: add some autumn leaves or other fitting accents to your gradient using a thin brush.
- Finish with a semi-matte or gloss depending on the look – satin can also mimic fallen leaves here.
As it turns out, autumnal designs’ highlighting factor is the flawless merger of the colors you’d think of when you think of autumn, merging from one to the other to make an attractive ombre. The Candy-Colored Ombre Coffin Nails Let’s transform your style into a fun and sweet look with the Candy-Colored Ombre Coffin Nails, everything you remember about candy floss skies is here with the pastel pinks, blues, and greens.
The design is quite straightforward to create the saccharine appearance using the following steps: Apply a clear base coat and a pastel pink or baby blue as the base. Layer everyone’s favorite candy tones with the ombre process, mixing them together with pink or extra into the center base color. Add sprinkle or confetti designs with nail art brushes or polishes for that enchanting, sugary finish.
Finish with a bright, shiny top coat to secure your luscious, candy-colored nails. The trick to a stunning candy-colored ombre is to choose shades that go hand in hand and match in a fluid and subtle gradient and result in a pleasant set of hues. The Art Deco Ombre Coffin Nails The Art Deco Ombre Coffin Nails evoke the glory of the Art Deco era; it includes traditional and contemporary elements and heavily relies on geometric and metallic designs.
Here’s how you may create this luxurious appearance: Apply a clear base coat and rich navy or obsidian black as the base. Create razor-sharp, Art Deco-inspired lines with a small nail art brush and metallic polishes or gold and silver foil; intersect several of these lines to get the style’s signature appearance. Ombre the bottom with midnight blues or dark grays, focusing on the effect within the Art Deco lines.
The most important thing in Art Deco nails are the ornate, harsh lines, which are the epitome of a design’s architectural, aesthetic sense. Celestial Ombre Coffin Nails The Celestial Ombre Coffin Nails is an ode to the skies. It plays with the ethereal beauty of the heavens and is littered with stars that shimmer and spectacularly gradient colors.
Here is how to get this celestial charm:
Step 1: Apply a clear base coat and a deep midnight blue or black as the color.
Step 2: Ombre a gradient from the cuticle to the tip in blues, purples, and lilacs, swirling like clouds.
Step 3: Put stars with a thin-tipped nail brush from the cuticle down, trailing off into the ombre after a bit.
Step 4: Get a shining topcoat for the night sky stars’ shine. Celestial Nails are all about capturing the cosmos’s captivating, delightful essence while combining deep blues and purples into a gorgeous gradient. Remember to include many stars for some celestial magic.