Title: The Subtle Art of White Ombre Nails: A Complete Guide for Nail Enthusiasts
Nowadays, when it comes to nail art, ombre designs have taken the hoop to a whole new level of sophistication. The subtle gradient that the ombre technique allows is enchanting and provides an unhideable canvas for your artistry. Although there are a million colors and styles to choose from, there is something particularly romantic about white ombre nails.
Clean and artistic, timeless and versatile, white ombre nails go well with just about anything one could imagine. The present post will discuss fading from white in a variety in color from a classic white and clear to ombre to white and galaxy. Each part will provide the necessary techniques, combinations, and suggestions for obtaining the perfect gradient. Whether a professional or a passionate nail artist, one may broaden the horizons with these infinite ombre possibilities.
It’s all too easy to ruin the whole look, so be sure your hand is light and your eye is discernible. Apply your white polish generously as a base, then dab lines of white over 70% of the nail, generously at the bottom and fading at the top with a makeup sponge. Then gently dip your sponge into nail polish remover and lightly dab around the edges of the white to sheer them into the other polish. Add three “coats” of clear polish to complete the look in the exact same manner as you did previously.
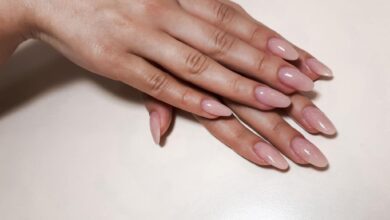
Start slowly: One major factor is to make sure you stop the ombre just below halfway up your nail so that the white appears to grow out of your nail bed. White to Nudes Ombre. Perfectly styled in a white to nude ombre nail, this color transition is a message of classic sophistication. Whether you’re rocking a perfectly white ombre or a barely-there shade, skin-color-transitions emphasize a natural look, making it perfect for all seasons and occasions.
The nude shade you choose should be flattering to your skin tone while also subtly lengthening and slimming your fingers. Find your nude: Countless shades of nude are available. A subtle transition: A subtle gradient is required, yet while you’re performing it as directed, make sure you add barely any polish.
-
White to pastel ombre. This option is perfect for girls who want to look like they have a dreamy look. The pastel color palette, such as light blue, soft pink, or lilac, will make your manicure look charming and etheric. ا. “Choose pastel shades that are lighter than white but pigmented enough to make a visual impact. A dreamy ombre looks fantastic because it pops due to the contrast.” * White to pink ombre. This ombre, with classic white transitioning into delicate pink, emphasizes femininity and grace.
-
The balance between the two colors is the crucial point of choosing pink. ا. “Choose a soft pastel shade of pink to maintain the transition’s thin line. Finesse is essential, so use a gentle touch.” * Add some feminine elements. If you enjoy all things pink, consider applying nail decals in this color. This small addition will enhance the ombre and look adorably feminine.
Fade from white to the gray safeties the perfect style that it embraces the ideals of modernity and subtlety. Ensure the gray tones select is compatible with the body temperatures. Start from the coal white at the bottom to a dark, smoky, cool color edging at the top .
The modern style demands a neat and appealing ombre. The gray color does not allow errors; the smoke should be done with a makeup sponge before it dries, or else the outcome looks pathetic . White-to-silver Ombre. For those that like some glam is their nails. Perfectly fade nails from white to a honed silvery polish. Add some silver or an iridescent whit of glitter for the glamorous effect is essential; it is a perfect style for special occasions.
A bit of glamour should be applied after the ombre when applying glitter . Mix the glitter with the white while newly applied on the nails if only it is essential for use. The metallic touch. When selecting on golden shades for ombre careful on the brushstrokes. For the metallic options, the strokes have to appear seamless, and one option is applying it using a makeup sponge for a seamless transition. Become subtle for the sponge application.
A white-to-gold ombre. White to golden fade oozes with luxury and elegance, perfect for those who love the color gold. Apply gold on the white with golden metallic, some gold fabric, or glitter. Different options should be picked depending on the need, subtlety, or screaming luxury.
What is better than a shiny gold ombre? Nothing can beat the sun when the shiny gold shimmer is on your nails. To get a bright and shiny gold ombre, gold polish can be used. You can apply a clear top coat in the middle or little down the nail. Then, golden foil can be pasted and then sealed with another coat of clear polish. To add a little shimmer, a soft golden color can be used, and it is a very polished and subtle look.
Pair white with shades of blue to create an ombre of the clean sky and the warm horizon in the still evening. A soft, baby blue or deep navy can accomplish this, making it an ombre of relaxing and calming. Too much white can be overcoming with the blue shades. Therefore, one shade of light blue should use to avoid overwhelming and should be a light shade. Place a few sheared clouds on your blue and then dip the tips.
White to Purple The white to purple is about elegance and sophistication. White and purple shades are opportunities to make it look royal. It is a look that is suitable for both day and night, and the shades can select a softer lavender or rich royal purple. It can be used as a purple material that can be matched with white for the look.
-
A Seamless Royalty
Pair your purple ombre with a delicate crown or fleur-de-lis on your accent nail for a correspondent touch of regal elan. Considering how effortlessly traditional ties with purple, this look is very refined.
-
-
White to Coral Ombre
Coral is always synonymous with warmth and life. That is why adding it to your white ombre nails is a perfect summer look. For your ombre to be flawless, always stay away from too light coral and too vibrant white—it should seem like the colors homegrown into each other.
-
-
Capturing Summery Vibes
Your corals should have a hint of pink but not too pink or bright; they should be equal. Apply the coral the same way you did with other shades – line it up next to the white for a seamless blend.
-
-
White to Red Ombre
With color dripping from white nails like vibrant red rain, what gesture could be grander and bolder? Let the forever conservative white safely wrap the outburst of vivid red on the tips.
-
-
Creating Contrast
There must be a severe difference between white and red. Opt for the brightest red nail polish you can, and make sure you have two-thirds of the nail white before beginning to sponge paint the upper third red.
-
-
White to Black Ombre
White ends in black – how can it be anything other than extreme and dramatic? However, the technique is everything in this ombre. It shouldn’t be muddy; it should be a gradient.
-
-
Keeping it Sleek
It should be slick, just like with red. You need to begin with an opaque, highly-pigmented black and away blending it with white. It will likely take many coats.
-
The rock-chick aesthetic
Combine your black and white nails to get sleek lines or add a metallic element to make an elegant fashion statement. If you follow this fun and modern combination, you will go “downtown.” White to rainbow ombre
If you are seeking extravagance and want to make a statement, try various shades that begin with white. When you choose such a design, you would use the full rainbow line and your options would be limitless. The outcomes could literally be whatever you want. A dash of color
The rainbow-style ombre has an additional time investment but is always worthwhile. From the beginning, pick the colors you desire and prepare them in the expected sequence. As you add the nail polish, do this quickly and let it begin with a smooth mix. Don’t be scared to blend a few styles together, like sponging or striping, to obtain the perfect impact. Play girly
Use accent themes to create a strong statement, or go for it if you are a fun of nail art. Stars, hearts, stripes, polka dots, go for it. White to glitter ombre
Add some lavishness to that white ombre with a little shine on your nails. Glitter differs from a straight metallic hue in that it has more texture and light. Stick to a hue or mix various glitter shades to make a one-of-a-kind, tailored shine. Create depth and light
If you tend to go for glitter, use it to add intensity and light. Swirl on your base color and add glitter on the tips. Glitter is indeed a color not a dropper, so be generous and use multiple layers to get enough light and contrast the concept in your nails. Shine bright like a diamond
A unique, texture or crystal-like glitter to add a touch of sparkle. This layer is not just intended to glitter brightly, but it will also express glitter.
White to Holographic Ombre
Holographic nails are presented in a futuristic and ethereal manner but shimmer and shift with every single movement. Starting with a white base enhances these qualities, while holographic or iridescent touches take it to the next level. Multi-dimensional Magic
Proper lighting on holographic polishes is essential. Choose the source of light or nail lamp that will has a real chance of bringing out the rainbow. The Hues of a Vision
Holographic polishes offer almost every single color of the color wheel in a single bottle. Find the hues that transition into holographic shades and into one another and into the white you are starting with for the best visual effect. White to Matte Ombre
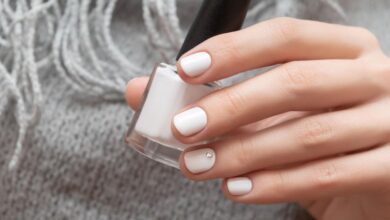
The epitome of understated chic is matte . White nails transformed into muted, velvety matte . The results are pretty modern, cutting-edge, and perfect for people who like to be perceived as unusual and inventive. The Power of a Matte Finish
The matte finish adds an unexpected layer to the ombre. Finish a gentle matte top coat over the hues after you have paired the colors to give it a soft, velvety touch. A Tactile Transition
The feeling of a non-reflective top-coat texture is subtle yet powerful. Make use of the top coat to smooth it out and prevent smears. White to Chrome Ombre
White play your white-made ombre nails with a new level of striping metallic importance and style. Chrome powder is unrivaled magnificently with a matte shift from white to silver.
Reflect the Transition . Choosing high-quality chrome is necessary to get the best result; do not forget to apply it thinly and thoroughly rubbed to achieve a seamless transition from white . Keeping it Metallic . To keep this look, remember to cover the design with a gel top coat over the chrome and cure it properly under a UV lamp; it will also also protect the manicure from chips and keep the reflective appearance shiny.
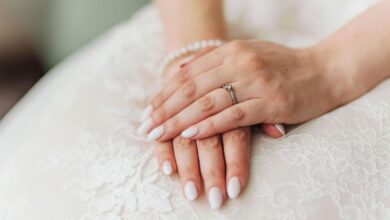
White to Pearl Ombre . White to pearl ombre nails is an excellent example of the gateway from traditional to more sophisticated elegance. The pearl will add fine shimmer and a feeling of light, making them perfect for a wedding-inspired or elegant look. Pearl ombre can be done with pearly polish on top of the white ombre or, alternatively, with actual pearl powder for an authentic, delicate touch.
Luminous Elegance Pearl designs need a light hand to remain delicately styled. Gently pat on the pearl-colored polish or powder onto the white transition section and rub with finesse. The Essence of a Pearl . Use a clear polish to mix the pearl powder to create a more viscous substance.
This will help you apply the powder more precisely and evenly and make it easy for the powder to adhere to your nails. White to Marble Ombre . A white ombre that transitions into a marble will give you a fusion of the familiar and a natural stone-imitation design for more contemporary chicness. While the marble may seem complicated to create, when done well, it is a true masterpiece on your nails.
The Art of Marbling
Start with a white-to-clear ombre base layer to get the desired marble effect. Using water marbling or layering vibrant brush strokes of gray or black colors will give you the natural lines. Finish the design with a light coat of transparent polish to blend it and ensure it is protected. Detail and Dexterity
Ensure you have a lot of patience and practice your dexterity. Try your hand as a designer with a piece of paper or purchase tools to ensure it is done right. And remember, practice is needed to perfect this art. White to Floral Ombre
Transitioning your ombre to a floral design screams romance. This design is ideal in spring and will attract the soul of someone who appreciates natural touches in their everyday routine. Blooming on Your Nails
One may add a little flair with hand-painted flowers or floral decals. Work the gradient as normal, stopping short when it comes to adding the filigree. To get the perfect look, make the flowers smaller closer to the foundation and more excellent closer to the tip. The Art of Florals
Floral nail art is genuinely an art. For this design, get some fine-tipped nail art print brushes and seek advice from a YouTube instruction video if suspicious. Choose a different color for your flowers so all the lovely details pop against your white base. White to Galaxy Ombre
This galaxy-inspired ombre on white is a great option for someone who craves a colder, more cosmic appearance. Stars, planets, and nebulae may all be meshed into a seamless ombreutorial.
With the magic of the universe at your fingertips
Creating the perfect illusion of the universe on your nails will require a lot of colors and art. Start with a white layer to work on, then add dark blues, purples, and even reds. Make the transition easier with a sponge and then add colors of voids expertly as well.
You could also add small hits of white, silver, or even gold to represent the stars . Gaze at the Stars galaxy nails are hard. Practice this life on a palette or paper before actually taking it on your nails . You can make nebulae and the dust of the cosmos with a lighter hand over time. White to Geometric Ombre A white ombre into geometric patterns is how you can add an ageless and artistic trendy look to your nails.
You can play around with lines, triangles, or squares and still achieve a style that is as daring as it is sophisticated. The Art of Geometry Stripping tape or stencils should be used technically to maintain the perfect shape and line for your geometric fear. Start with your white and color fear, then finish the geometric with more color or matching colors, as you feel .
Get the right way for the perfect line, you do not want to wobble your geometric design. White to Abstract Ombre Abstract leaves room for endless opportunities. You could use unique materials such as sponges or sticks, incorporate various textures, or mix and match your colors and textures. The Canvas of Your Life For the most abstract designs, almost anything goes.
In the Vein of Individuality When it comes to nail art on ombre nails, abstract designs are what it is all about. There are no limits when it comes to mixing unlikely textures to make your design one-of-a-kind. Conclusion When white ombre nails are the canvas, the design is totally up to you. As with anything else, play around with what you like and don’t be afraid to try fresh combos.
Whether you go for something classic or innovative, just go for it. You can create all types of funky designs with just a little imagination. Nail art is a creative world without boundaries, literally. Use these white ombre nail ideas as a starting point and go it out on your own. The possibilities are unlimited, and the world of white ombre nails are all-ours.