Mastering the Red Ombre Nails: Detailed Explanations
From a mere fashion, ombre nails have developed into a basic technique of nail art. It is often gripped by the practitioners of beauty impeccably. A beautiful faded look alway carves out two or three kinds or more harmonious colors.
This glossy appearance is attracted not only by regular enthusiasts, but even those creators peculiarly interested in its beauty : have all made use of this effect. From the grand to the restrained, ombre nails allow a broad field of design options that spoke to each character stripe and event. ‘Red ombre nails 101: A Bold and Vibrant Technique
First let’s go over the basics of ombre nails. A French word meaning “to shade,” ombre reflects the original intention behind the technique. Classic ombre nails require a smooth transition from one color to another. When it comes to red ombre, the color isn’t simply one that pops—but one that mesmerizes as well. Red ombre nails might be the top you need, at any festival or holiday date whether it’s a Valentine’s Day.
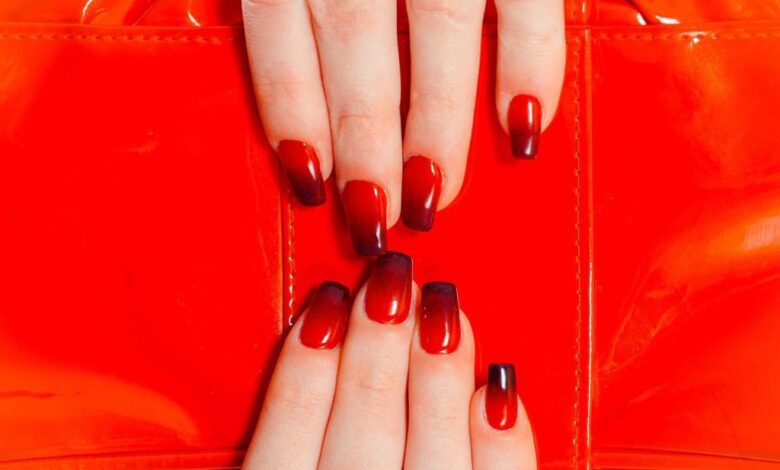
Classic Red to Black Ombre: A Timeless Transition of Power
Think of a process of transition that starts with the fire-brand red and finishes in darkest night black. This dramatic ombre is a perfect fit for someone with a little attitude on their fingertips. The technique depends on combining colors with meticulousness using either a makeup sponge or ombre brush. With just a little patience and a steady hand, everybody can accomplish the dark, unperfected harmony that is eye-catching and exciting.
How to Achieve the Classic Red to Black Ombre
Apply a clear base coat first to protect your nail.
Paint your fingernails completely with vibrant red nail polish. Make sure to dry it all the way.
Dab your sponge or use the ombre brush with black polish and then gently tap it onto your nails, moving the polish from tip to cuticle.
Keep on repeating this process of dabbing and tapping until you have shaded to your satisfaction, making sure to let each layer dry in between.
Finish off with a clear topcoat to seal in the colors and give them an extra shine — let dry before you handle anything.
Red to White Gradient Ombre: Delicate & Dreamy
For a more subtle effect that speaks of grace, a red to white gradient is the way to go. This design takes a gentle hand to make sure the transition is as soft as cloud. It is a versatile choice for both casual and formal occasions, giving polished, refined look but anything but plain.
Ombre from Red to White Use Tips
Start with the same steps as the classic ombre, beginning with a clean base coat and applying red.
Use pure white or a soft off-white color to form the gradient. Apply white using a makeup sponge or ombre brush from the bottom of nail–gently go upward and blend in red color.
If transitions are not smooth as cloudy and you’d like them. Then insert an intermediate layer of pink at transition line between red and white to help resolve this stumbling block.
And for a professional finish, seal looks in a top quality top coat.
Red to Pink Ombre: A Harmonious Exchanging of Colors
Not merely charming but also romantic–is this what you’re looking for? The gradient from red to pink is here. This nail art that gently transitions from passionate reds to mild pinks has a strong sense of nostalgia about it, perfect for when you are celebrating love or just feeling a little when reexamine yourself. However, the innovative nail girl can also use different shades of reds and pinks to give her ombre some added depth.
How to create the perfect Red to Pink Gradient
Start from a clear base coat you trust and use a vibrant red nail polish to cover your nails.
Next, using a sponge or a ombre brush to softly blend your hot pink shade with the red starting at the base of your nail.
Add a light pink color in the middle portion of your design, blend it well with both the red and original main hue for added complexity.
Protect your finger painting by glossing over all its twists and turns.
Red to Orange Sunset Ombre: Warmth at Your Fingertips
For a design that captures the warm and brilliant nature of sunset, transition your color from one shade of red to orange. This color combination evokes positivity along with energy-which is perfect for anyone who is carefree in spirit or kinetic by nature.
Ideas for a Bold Red to Orange Sunset Ombre
Start by painting your nails a bright clear base coat.
Dip a sponge or brush into the pure red and blend it from the base of the nail.
At the top tip area, put a lightened yellow with details to get true sunburst results.
Seal the design with a glossy top coat for nails that reflect brilliance.
Red to Burgundy Gradient: Rich and Sultry Ombre
If you’re after the lure of sophistication, look no further than the red to burgundy ombre. This rich, layered effect pulls out the depth and complexity of red tones and produces a beautiful, elegant look. This ombre design is ideal for evening,wedding or party wear, a fine example ofthe effect caused by minute variations in color that can make even the simple look sophisticated and fresh.
How to Create a Luxurious Red to Burgundy Gradient
To keep the nails from getting smudged,rubbing and other damage, apply a clear protective base coat.
Apply a layer of deep red on your nails, letting it dry completely before proceeding.
Use a sponge or ombre brush with a dark burgundy color to create the gradient, starting at the base of your nail and blending smoothly upwards.
To improve the effect, the last gradient can be repeated with red lacquer for a more potent punch.
To protect the polish and give a lustrous touch, a top coat is very useful.
Red to Gold Ombre Shimmer: A Touch of Luxurious Style
The golden gleam of reds and golds add glamour and glitz to your nails. In this eyes-catching look, light reflects off each nail making it a real jewel. Whether its for those special occasions or just an ordinary day turning your nails from brown all-day Winterwear into stunning yet practical Golden Medallion designs is an excellent idea.
Incorporating Shimmer with Red and Gold Hues
Put on your clear base coat, perfect to keep nails in shape.
Color your nails in red. To give added sparkle, select a shade with golden undertones for this step.
Bring a true gold glitter polish into the mix useing a brush or sponge, and blend towards the tips of each nail.
Apply thin layers of golden glitter for a subdued shine or apply more generously to enliven your work with sheer brilliancy.
Seal in that glittering shine with a top coat that is suitable for glitter.
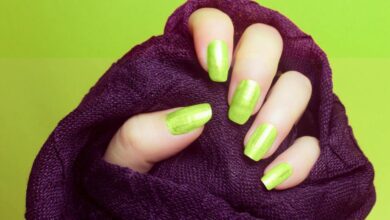
Red Berry to Purple Ombre: Healthy and Joyful OutburstFor a playful and audacious look, try out red to purple berry ombre. This vivacious blend vividly captures the freshness and vivacity of ripe berries. Such a design is very festive and cheer-fraught, at home as a summer picnic or urban setting rife with treasures waiting to happen.
Tips for Red to PurpleReceiving red and allow a protective base coat to dry on nailsPaint nails a delicious red color reminiscent of fresh cherries.Apply purple with your sponge or brush, blending down from the shadow to tip of each nail.Really think about the different shades of purple to give this ombre at least some depth and complexity.
Do n’t forget to add a glossy top coat on those colors to make them jump out and keep them looking new.Red to Coral Gradient: Time for Summer FruitAgain the Sun shone, and summer’s vibrant colors picked up. Red to coral gradient, for the season. Here, a warm transition warms the heart and and fits sunshine neatly in its pocket. This is a multipurpose design that can be turned into something exotic or something down-home.Adding Chunks of Red to Your Coral GradientPreparations, as always, start with a clear, protective base coat.
Apply the red lacquer from a hot summer in about a hundred shades of pink.Use coral paint that has the flavor of a day at the beach or feelings from vacation to create a gradient.Vary the color in the transition between pink bits.Complete your sunny look with a top coat that reflects the cloudless summer sky.jpg
From Red to Nude: A Subtle Ombre
Less is more, as the saying goes. The red to nude ombre is not shouting “beauty”–it whispers it, with an understated elegance that is perfect in professional settings or when you want things to be simple yet look refined.
Softly Blending Red into Nude for a Discreet Ombre
Start by protecting the natural beauty of your nails with a clear base coat.
Start the transition, however, with a deep hue of red that is soft enough to pass for natural skin color.
Follow this gradual blend with a nude polish that accents your red, ensuring the transition is not apparent at all.
For a more sophisticated look, add gold to the mix.
The final touch: the finest topcoat, of course— to go on top for a smooth, glass-like finish that makes everyone look twice.
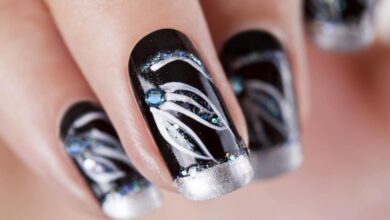
Red to Silver Glitter Ombre: Sparkle and Shine
No festive event is complete without some sparkle. The red to silver glitter ombre is your go-to when you want to make a statement. It’s all about the bling, the flash and that inimitable radiance only glitter can offer. Get prepared to shine–like a star with this sparkling ombre.
Red into Silver Introducing Glitter for a Festive Feel
Start by protecting your nails with a clear base coat.
Use a red lovelyme and polish this onto your masterpiece.
The silver glitter polish then goes on with a sponge from the bottom of each nail to give a brilliant transition.
Play it light for just a slight show or apply thickly for one real attention-getter.
No one puts a dull finish over your dazzling design. Coat with a top that won’t spoil the effect of your disco ball nails.
A Rainy Day Ombre: Damp and Gray Candlelight
Circumstances insisted, and a rainy day ombre was born. An ashen blending from slate to ghostly white, the rain ombre captures spirits already sodden in gripeatness. Whether on a meal, at a party or even just feeling a tad warm-this design will keep your fingers warm and shining.
The Rainy Day Ombre: A Step-by-Step Guide
To prepare for the postseason magic, seal off your nails with a tough transparent carpet.
Go about as scarlet as the season demands, with a passionate red.
Add an emerald green to your brush or sponge, blending nicely with the red for a delightful ombre. An adult beverage was served in this concoction; consider it in its original form if you like one that is lower in alcohol.
Add a touch of gold at the point where color transitions for an extra dash of temptation.
Use a top coat with the sheen of tinsel on it and your holiday cheer will shine for all the world to see.
A Red to Blue Ocean Ombre: A Deep, Serene Experience
For those who find peace and tranquility in the heart of the ocean, the red to blue ocean ombre is a great choice. A blend of passionate reds existing in transition to serene blues which makes for peace and tranquility– it also just happens to be perfect when you’re looking for that warm place to take a break on your own, or as you dream of the sea.
To Create a Calm Red to Blue Ocean Ombre
Cover your nails with a transparent coat so they are shielded from life’s rough seas.
Start the ombre with a deep red that speaks of the fire in your heart and passion within your soul.
Gently introduce a light blue on the sponge or brush like a sea breeze rejuvenating you, until you have reached your ideal feeling of peace.
Fanshe the horizon between your design will shimmer in a fresh gold, a radiant yellow or as bright as your own personality.
seal-off the atmosphere with some clear top coat as vast and quiet as this ocean sky.
From Red to Yellow: a sunrise ombre Exploding with Vitality
There is no energy source greater than that in a sunrise. The overnight Passionate crimson turns to resplendent yellows of the new day ahead. The power of transformation is magical. Capture this dynamic force with a red to yellow sunrise ombre that promises a day full of potential and possibility.
Inspire with a Red to Yellow sunrise ombre
begin with a clear base coat durable as the sunrise.
Paint your nails with a red that signals the end of Evening passion.
Use a yellow that is refreshing as a new day with a sponge or brush, painting strokes gently.
For Those in an artistic mood, add a sunburst or horizon painting on your nails to the cheers of first light.
Your day begins with the inspiration of this top coat, swirling as though it were itself fresh morning dew.
Red to White Ombre: a hauntingly beautiful winter tale Snowflake
Winter’s mystery, white snow against passionate red cheeks is expressed in a red to white snowflake. The transformation reflects the season’s double face: warmth from both feasting and frosty chill.
Conjuring the Red to White Snowflake Ombre
start with a clear base coat, setting your winter story with the sun.
brush in red nail polish fit for winter festivals and echo the colour of this season.
Use a white nail polish to fade from red into the innocence of newly fallen snow, using a sponge or dosha.
There are two methods of making snowflake nail art with delicate strokes. The first relies on a brush and the second shopping for professional stamping plates.
Use a hard top coat which manages to stave off winter’s cold edge.
From Red to Black Cherry-Blossom Ombre: A Life Portrait in Dedication
For a design as fragile as beautiful-try turning the red to black cherry blossom ombre. The work is all feeling, capturing the fullness of life’s experiences with an unrelieved black depth and passionate red of vitality, punctuated prhaps by cherry blossoms’ gentle charm.
A Red to Black Cherry Blossom Ombre: Works Part of The Art
Begin with a clear base coat that represents cherry blossoms’ fragrance and gentility.
Don your canvas with a red that is as full of life as the blooms themselves.
Fade to a deep black that captures the beauty in life’s shadows.
Do the cherry blossom artwork using the finest tools at hand or recapturing the lost strokes of your youth.
Keep track of your masterpiece with a top coat, ensuring the cherry blossoms never decay.
From Red to Gold Fireworks Ombre: A Celebration in Every Brushstroke
Now and again life itself seems to celebrate, and the sky’s every corner is full of fireworks. At such times, the red to gold fireworks ombre is a personal exclamation of joy that echoes aloud on life’s grand occasions.
Lighting a Red to Gold Fireworks Ombre
First choose a clear base coat.
Paint your nails red-as ardent as the heart.
Then use gold to pick up the object of joy like a house ablaze.
Make every nail a star of the show in the personal celebration of your own life, celebrating with design splendor and spectacle.
Just like the booming fireworks, a top coat that shimmers and shines will echo all night long what a magnificent event your nails have attended.
Red to Brown Autumn Ombre: Nature’s Changing Colors
Autumn has its own color palette, and the red to brown ombre can capture the beauty of seasonal hues transition from summer warmth to winter chill. It is a design that marks all changes, and with rugged beauty finds gorgeousness in phase change.
Red to Brown Autumn Ombre: Transitioning With the Changing Colors of Earth
Take a clear base, like the clear skies at the beginning of early fall.
Use a red reminiscent of the season’s harvest and warmth to coat your nails.
Blend in a brown as solid and decisive as the season’s leaves off to fall, using a sponge or brush to ensure that the ombre reflects nature’s gentleness at this time. Then smile inwardly, enjoying its good fortune in life’s trough between one thing and another.
Follow the season with nail art, whether it be leaves or acorns; or the branches thrusting above winter’s threshold.
Remember to seal the look with a top coat which can withstand any season.
Red to Gray Stormy Sky Ombre: A Literary Universe between Two Fingers
The stormy skies of literature have a romanticism all their own, now with the red to gray ombre it captures this mood: sophisticated and deep.
Weaving the Red to Gray Stormy Sky Ombre
First start with a clear base coat, to capture the mysterious skies from which spring lightning tempest.
Paint your nails a red quite as wild as the storm about to break loose.
Blend in a gray as heavy as an oncoming tempest with your sponge or brush that catches the flow of narrative.
Add in some stormy , lawless nail art that underlines the seasons story–rainbows, raindrop accents, lightning bolts–whichever this particular storm calls for.
A top coat as cryptic as the skies will, ensure your story’s every chapter is protected.
Red to White Candy Cane Ombre: A Taste of Festival
The holidays are a blend of tastes and scents, moments in life that freeze like sweet sugar on the tongue. The red to white gradient is like a living swizzle cipher, encapsulating all these experiences with each stroke. So now cheer carries wherever you go!
Red to White Candy Cane Ombre Fragrant and Flavorful
Prepare yourself for the finest of seasons with a transparent base as anticipatory as you are.
Redolence of Joy Adorn your nails with a red as lavish and enticing as any of the seasons pleasures.
Dust it with white that is as fresh and cool as the air at Christmas.
Add the iconic candy cane strips using tape or paint, so significant in your drawing as an image to be tasted and chewed.
Preserve your candy cane cheer with a top coat as sweet and indomitable as the season itself.
Red to Lavender Floral Ombre: A Bouquet of Beauties
Nothing quite captures the charm of flowers like an ombre that changes gracefully from red to lavender. It is incredibly beautiful from any angle, a design style that completely embodies the delicacy and depth of nature’s most personal expressions.
Sprouting the Red to Lavender Floral Ombre
Begin with a transparent base that is as nourishing as the soil.
Paint your nails a red that blooms both with life and emotion.
Add in a lavender scent that is so rich and natural, as though you were painting every one of its strokes with your own touch.
This design makes us feel loads more joy from the bounties of Nature.A clear top coat just as delicate as dew on a petal will look after each detail in its moment.Red to Rose Gold Sparkle Ombre: A Touch of Glamour
Like clear moments of glamour that appear as if from nowhere, sometimes the ordinary is lumps of gold. Red to rose-gold sparkle ombre this little bit of style ensues with each nail, assuring that you won’t be part of the crowd and catching all life has to offer. (Please see Q&A)Sparkling life into being with red to rose gold nails
Start by applying a clear basecoat to experience what everyday life can bring.Red color your nails with a finish that sparkles and gleams, paying tribute to everyday living magic.
Incorporating rose gold glitter gives an added touch of luxury, making it essential to carefully place all the sparkles with sponge or brush.
If you’d like some extra nail art that speaks directly to you – rhinestones, elaborate designs or anything else in between – add it here.
In the end, seal it all with a top coat that shines every bit as much as you do. In general, red – gold ombre is a flexible and multifaceted design; adaptable to any occasion or frame of mind. Be it celebrating a grand moment in life or bringing out the beauty from within everyday transformations, this ombre serves as our note to always embrace change and give life a beautiful shape.
The variations are countless on this classic ombre, so by all means let your imagination run wild and see where the red to gold road leads you. Therefore paint up your heart-rate passion and trigger off life’s fireworks wherever you go. Happy painting!