In the holistic realm of beauty adventures, nail artistry is on of an external expression form. Every swipe of the brush, each dashed line is a masterpiece unfolding; breathing life into an artist’s vision through a mini-canvas of color and imagination. While there are unlimited nail forms to dapple with, the short almond nail is an optimal selection when it comes to the fashionable and sleek rounded edge.
The short almond nail is an ideal alternative for those looking for a chic yet comfortable nail style , offering a suitable working plinth with a smooth almond style. Here’s a guide to everything you need to know about short almond nail art, including a blend of existing and current patterns listed as sections for a distinctive and trending nail aesthetic.
Classic French Tip with a Modern Almond Twist French tippy is a timeless design that is neat and straightforward. It was initially employed in an enamel application for posts, but it’s a fresh twentieth-century enhancement. Here’s how to reach French almandine :
1. Ice the nails and set aside some time to file and cut them into short almonds.
2. Protect your natural fingernails with a translucent top to shield them and extend the life of your nail model.
3. Define the top of the nail by painting a thin white line across with a guideline to produce a neat line that follows the natural curve of our almond bed. 4. Apply the lighter end to the foundation of the bed to attain a perfect gradient effect.
Step 5: Topcoat Seal – Once you are satisfied with your design, get a high-gloss topcoat to help lock all that hard work securely in place while adding a bit of protection too! Minimalist Lines and Dots Everybody loves a bit of minimalist art, and that is just as relevant to nail art.
Almond nails are fabulous for minimalist nail art because of the way they play with length, which gives them so much character. And when you just focus on lines or dots, the result is amazing! To get the perfect minimalist flair:
Step 1: A single line Trim – Use the thinnest brush you have to draw a bright single line straight down the length of the center of each nail.
Step 2: 2nd Line – If you’re feeling brave, a parallel mowing line is beautiful!
Step 3: Dots and Dashes – Play around with dots and dashes, stringing them out in a straight line or curve to follow the line of your nails.
Step 4: Colors – Pick contrasting colors or matching ones; the only rule of minimalism is that it has to stand out without closing in the nail’s natural beauty. Step 5: Finish the look with a matte top coat for a bit of time proofing or a shiny one for a touch of classic whimsy. Soft Pastel Ombre There is almost nothing as light and feminine and attractive like a softly blended pastel. They are the perfect way to add range to the color with just a bit of whimsy. This ombre technique is all about the soft transition.
Step 1: Color choices – Choose your favorite two up to four pastels that work together and meet your skin tone’s match.
Step 2: The base color – Use the lightest color to create your first coat as the ‘base.’ Make sure it dries out properly.
-
Create a Gradient: Use a makeup sponge to dab on your secondary color from the midpoint of the nails, blending the polish upwards and downwards. You should try to achieve a seamless gradient without any noticeable lines.
-
4. Repeat with Other Colors: Repeat the sponge technique with other colors if you desire and keep them closer to the tip of the nail to create a multi-hued effect. 5. Smooth it Out: Use a sheer white or glitter polish in the middle of the ombre to transition and soften the blend. 6. Top It Off: Apply a glossy top coat to enhance the colors and provide a polished finish .
-
Bold Geometric Patterns Geometric patterns can immediately modernize your almond nails. With unique lines, angles, and shapes, this style can make a statement while staying elegant and sophisticated. Here is how to recreate this striking design: 1. Plan Your Design: Decide where to place your geometric shapes on each of your nails.
-
For example, you can create a diagonal line on each of your nails, a colorful triangle, or you overlay a few connected squares. 2. Nail Tape: Use nail tape to create the sharp lines. Apply the tape on the nail, covering the areas where you should not apply the polish. 3. Add Color: Use a contrasting color and apply polish onto the spaces taped out. Ensure you apply the color evenly and in thin layers.
-
Seal It: once the design is perfect, seal it with a glossy top coat for that fine finish. Glitter Accents on Almond Nails A touch of glitter can lift any nail design and add some more glamour. When properly placed on almond nails, glitter accents can look both graceful and party-ready.
-
The process to make it is Step 1: Prep Your Base To get started, make sure to apply a solid base color that goes with the shade of glitter you plan on using. Step 2: Apply Nail Glue To Get the glitter to stick securely, dab some nail glue on the part of your nail you want to apply some shine. Step 3: Add Glitter Dip a flat brush into your glitter or pick up some with your fingers, then press it gently against the glued space on your nail.
-
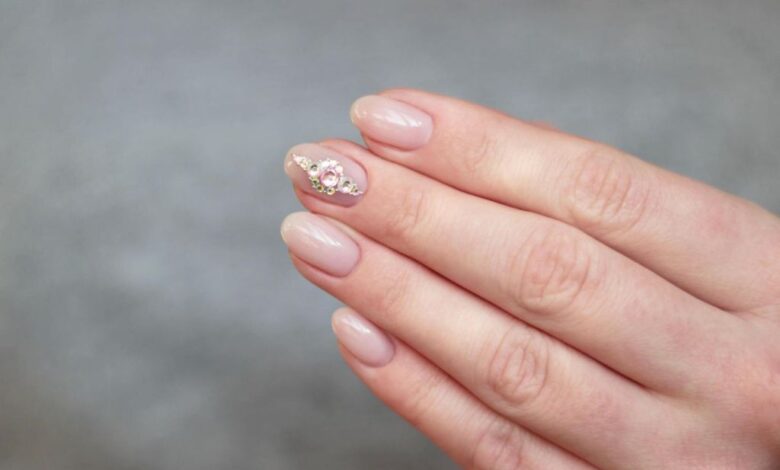
Add layers of glitter as needed for intensity. Step 4: Seal the Glitter Once satisfied with your glitter results, seal it all in with a glossy top coat. Make sure to cap the free edge so that the little sparkles do not get stuck on clothes. Elegant Floral Motifs Flowers are a staple of both nail art and beauty, offering an elegant décor with a timeless flair.
-
On almond-shaped nails, they can be done in all shapes and sizes, from miniature and delicate to grand and vibrant. Here is how to do it: Step 1: Choose Your Tools. Use a fine brush, dotting tool, or nail decals Step 2: Plan Your Placement. Decide where on the nail you wish to place your design. For example, a clump at the base, one flower at the tip, or a vine along the side.
Step 3: Outline your flowers. Using the contrasting color to your base, draw with your tool the basic shape of flowers and leaves. Step 4: Fill in the shapes and color the petals and leaves with your chosen nail polish colors and add some variation in colors to resemble actual petals and leaves. Step 5: Create small details, once dry, with a contrasting color, you can create small details with the tool.
Step 6: above all, seal everything with a very smoothing base coat without ruining the design. Metallic Stripes and Accents Metallics on nails always convey such warm luxious richness, hard to accomplish with non-metallic colors. Step 1: Select your metals. Choose between pure gold, silver, or rose gold, or along with some regular colors for a costume jewel vibe.
Step 2: Line it out. For stripes, use nail tape. For pure metal, 6ake this a base color, and add some dust above it. Step 3: Go all out. If you feel a bit extra, fill it all with great glow in the dark base and add some dust on top of it. Step 4: Embellish your nails restart with small metal studs or dust. Step 5: Seal your nails with the top coat.
-
Lace-Inspired Nail Art
Lace is an eternally romantic fabric, and its intricate patterns translate beautifully to your almonds. That lace design adds a touch of Scarzle r see. Here’s how to create the look:
-
-
Step one , use a neutral base : A light neutral could work as the base to mimic a look.
-
Stencil it out: As I design with lace stencils, hurl patterns, or even a proper lace nail wrap.
-
Step two: add contrast. If you’re using dark color for the lace, see that the contrast is high. If you’re going for a subtle look, use a lighter spray for the lace.
-
Step four: enhance with accent. Add rhinestones, small pearls that are in the base of flowers in your poor lace pattern for added elegance.
-
Step five : set with a top coat. Once you’re lace is perfect, seal it in with a topcoat under the runway or o a sheet of regular paper.
-
Glossy and Matte Contrasts
Splash polish in glossy and matte finishes can also create a dynamic and sophisticated look. The textural difference can add depth and interest to your nail out. Here’s how to achieve the contrast:
-
-
Step one: paint the base. This should be any color of your choice applied to all your nails as a base color.
-
Step two: divide and conquer. critical parts of your nail should be more or less of glossy and were about to reveals which were which can be the sap and base of the entire mail.
Step 3: Finish – Apply a matte top coat to the non-reflective areas. Cap the free edge to maintain a long-lasting look. For the gloss, one can choose to finish using regular topcoat or a gel top coat for maximum shine. Step 4: Perfect- Clean any smudges and excess topcoat leaving your final design with a contrast that stands out. Step 5: Flaunt your Flare – Whether subtle or a statement, the glossy and matte finishes catch the eye of many and, they seem to be the objects of curiosity.
Celestial Themes and Constellations Cosmic designs are an exciting journey and looking at the night sky for inspiration gives one a creative avenue. With almond nails, one can show off the night sky. The following are steps to do so: Step 1: Background – Choose a deep, starry dark polish for nail designing. Dark blues and purples are recommended. Step 2: Stars – With a fine nail brush, make small round light shapes that form stars in the sky.
They do not have to be regular shapes, and they can vary in size. Step 3: Constellations make sure you take one constellation and map them on the nail with a close-up look. Step 4: Cosmic Elements – stars need complements to look outstanding. You can add the moon phases or a galaxy. The complement should be the best to beat it.
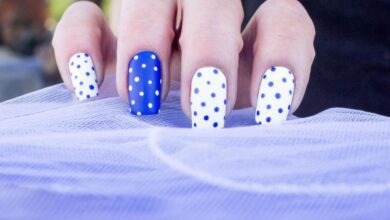
Step 5: The Milky Way – Add a touch of glitter polish or spread fine glitter flakes for a milky way finish. Vintage Polka Dots and Stripes Being playful can be trendy, and polka dots or, stripes are everything the designer needs . Step 1: Choose the Colours
Step 2: apply the base color. Paint your nails with the base color and wait for them to dry completely. Step 3: Dot it up. Using a dotting tool, create perfectly round dots in any pattern of your choosing. This could be as simple as a classic large dot in the center of your nail or as playful as precise, tiny dots in varying sizes and colors. Step 4: Stripe it out .
Add stripes to the mix with the help of a nail striping brush or nail tape for a retro-design finish. Step 5: seal the dot and line design with a glossy top coat for a complete retro-vibe design finish. Tropical Paradise Step
1: choose vibrant colors Alow humidity is not one of the required ingredients; you can replicate the experience of the tropics by using bright, lush colors. Colors ranging from deep green to light green, from pinks to vivid greens. Step 2: paint the base color. Paint your nails with the main background color before starting your tropical scene.
A numerous approach can make it more dramatic by painting your nails with gradual color blending starting from light to dark. Step 3: add detail: Using a fine nail brush, paint tropical leaves, palm leaves, hibiscus flowers, and other tropical motifs on your nails. Step 4: adorn with accents, add glittens or rhinestones to enhance your tropical island’s best look. Step 5: finish with a glossy top coat.
The art of seasonality. The last option for extravagant almond nails is dressing them to match the occasion. The perfect opportunity to adjust your nail art to the season or the holiday vibe. The art of adapting your nail drawing to the current season contributes to a joyful and lively spirit, much expected, particularly with the ongoing trend of abstract art and splashes of color.
Spring sprouts. For instance, you can brighten your nails with a design that includes fresh pastel hues and floral patterns to match the blooming of the season. See if you personally recommend any of the following forms of design: Summer sunlight. Sunshine and the sandy beach are what people want most during the summer. You can combine ocean designs or a magnificent sunset on your nails to soak your nails into the sun’s summer feel. Fall foliates.
This season will be coming and going in no time; you should honor it with your nail painting in a rich autumn color. Ombre shades, which mimic the falling leaves, would match any casual clothing you put on at any season.
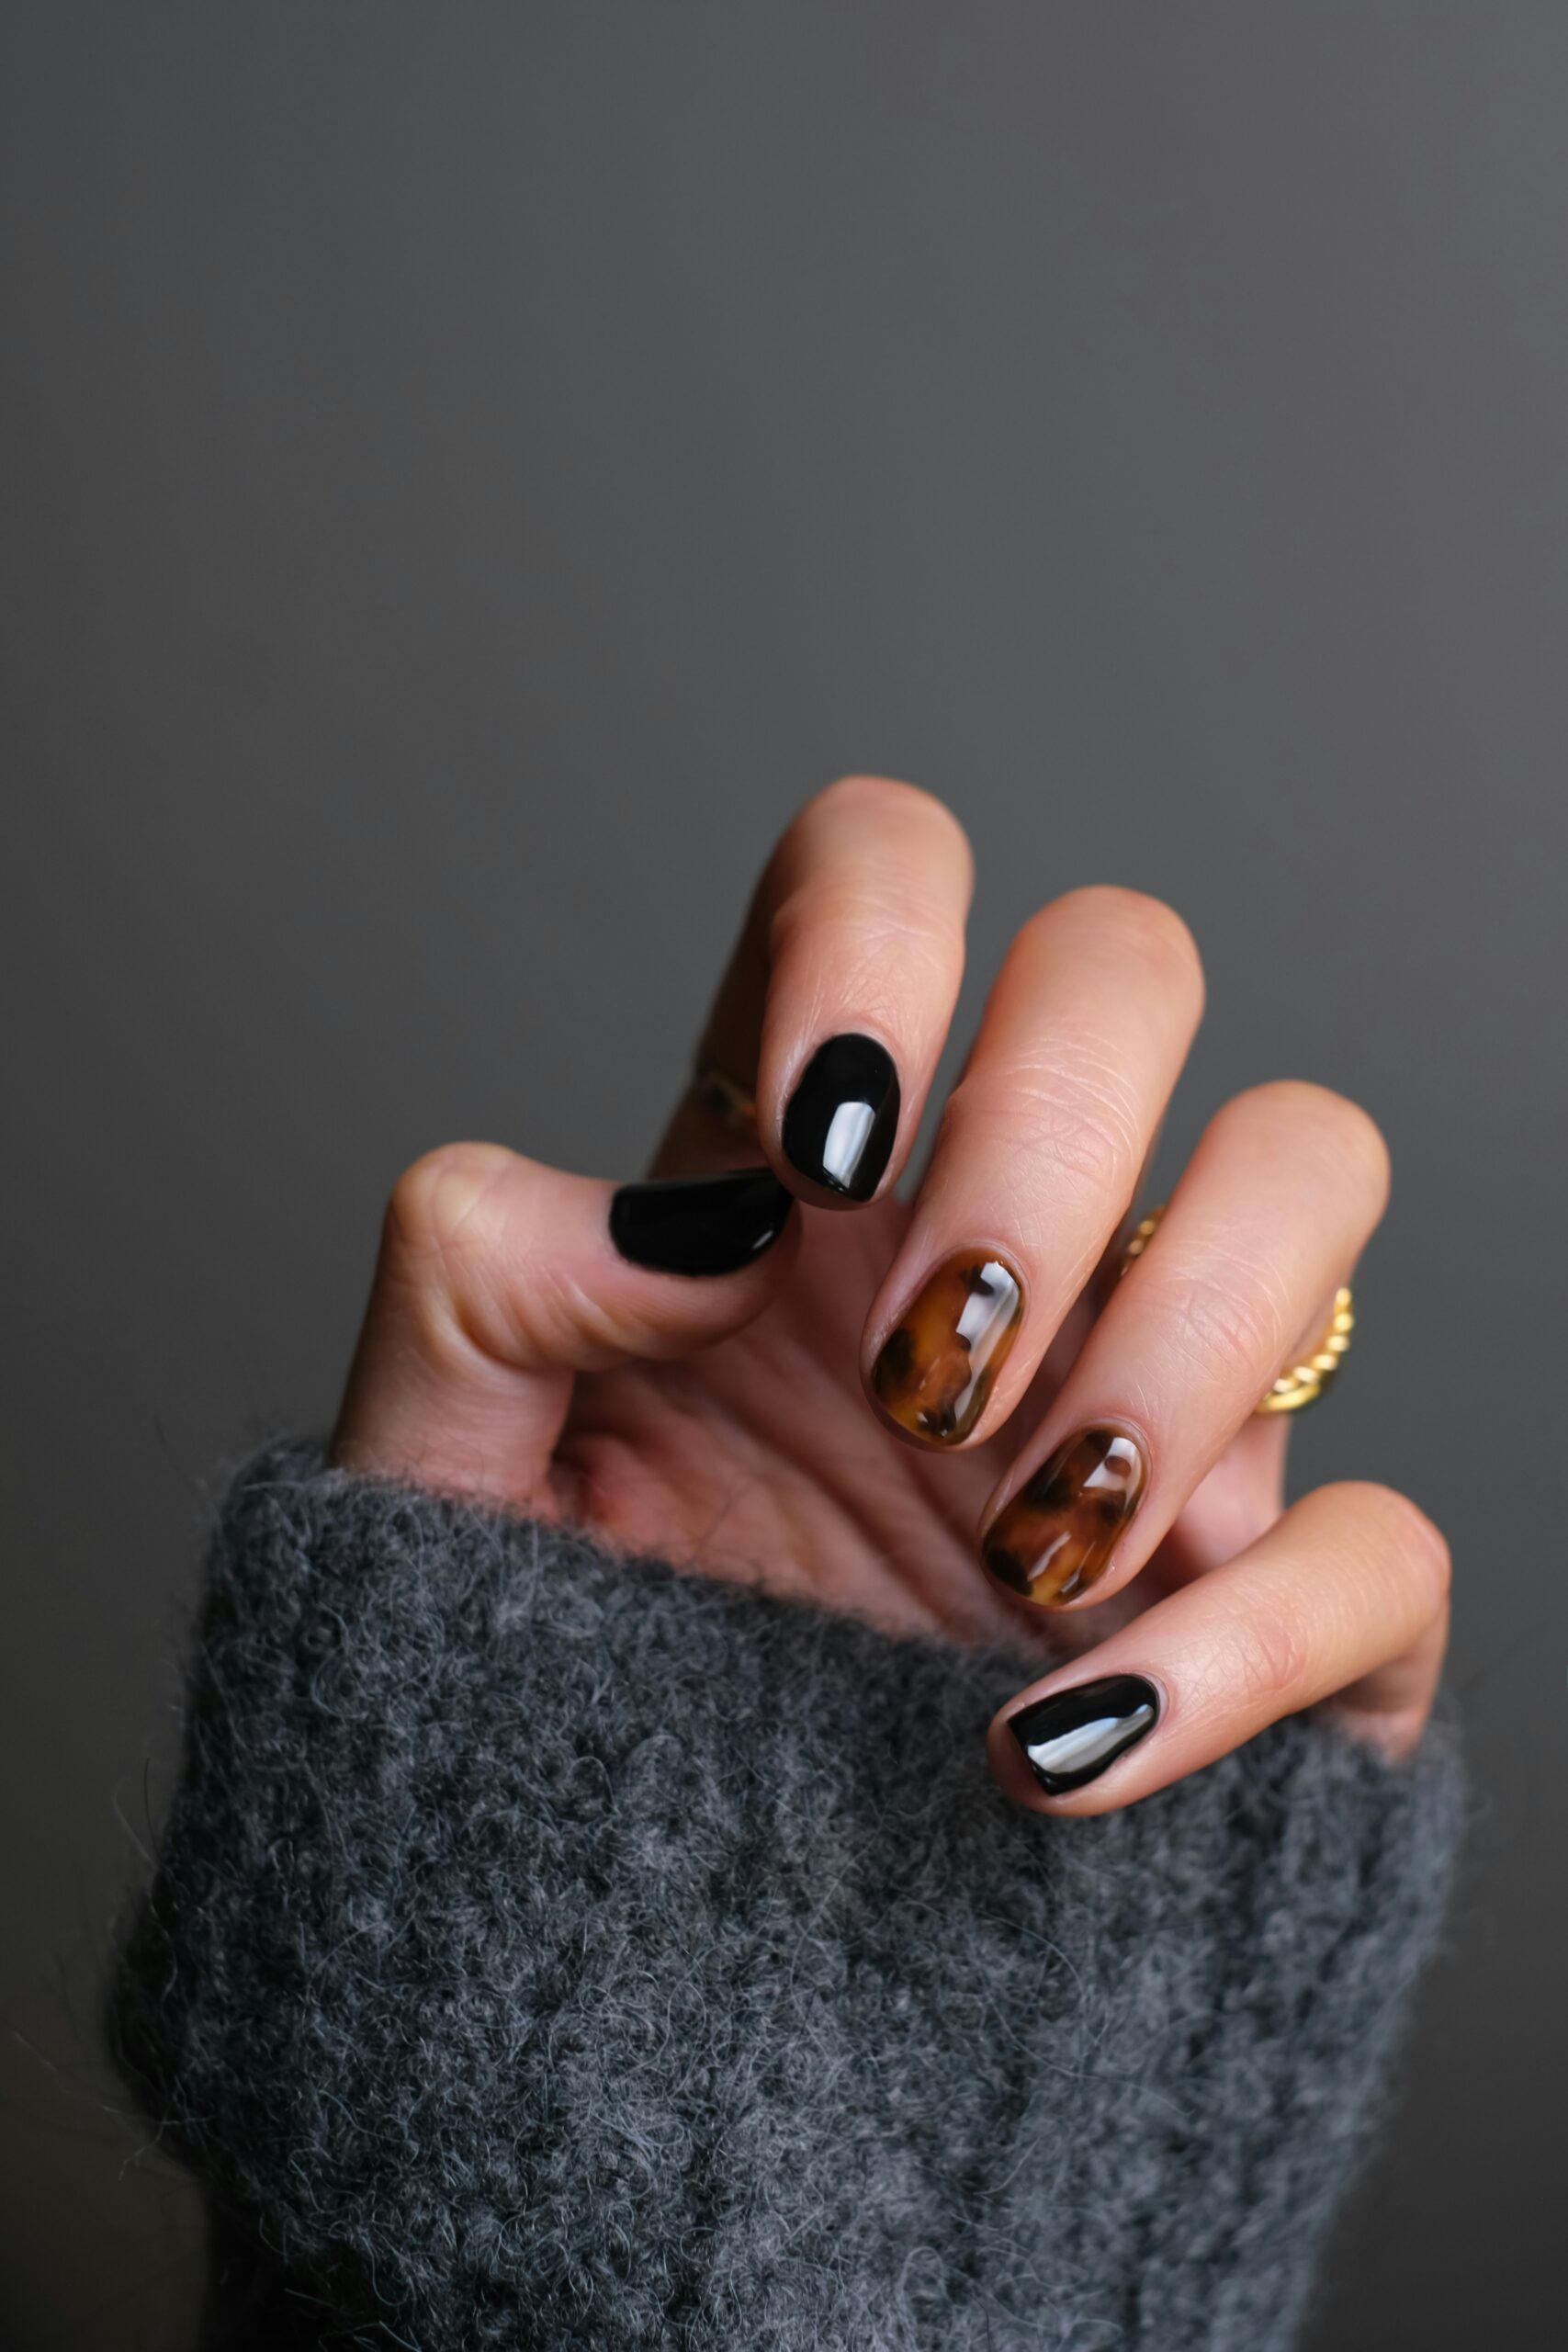
Explore your artistic side and your wild side by incorporating animal prints and textures. For example, animal prints are a tried-and-true statement in fashion, and when featured on almond nails, they offer a more edgy appearance. Here’s how to do it: First, identify the animal whose prints you wish to mirror.
Leopard spots, zebra stripes, and snake scales are all classic choices, but feel free to try your hand at peacock or giraffe inspired patterns. Next, use a fine tip brush to add spots, stripes, or scales that matches the chosen animal’s texture. Finally, if possible, try to use natural colors that correspond with the animal print you’re imitating to complete the effect.
For an added 3D appearance, attach small appliques like small feathers to a bird pattern or tiny chains to a reptile theme. Seal your canvases with a bright topcoat to make them appear realistic and give a shiny exterior to your wild designs. Neon colors can make a big impression by being bold. They also shine bright on almond nails, which adds a vibrant burst of color that can’t be disregarded.
For an even more intense look, layer your neons over black polish. The contrast between the two will be chic and edgy. You can finish off with a glossy top coat to keep your nails shiny and bright. Marble and stone effects are another sophisticated and fashionable design for almond nails. You can make the design even better by adding some stone or marble texture.
You will need two to three shades of acrylic paint or nail polish that look good together. The classic shades are white, black, and grey. Place droplets of each color on your nail. You can use a dry brush or a toothpick to make the marble effect by gently twisting and swirling them. You can then add more color with a sponge to make the effect a bit stony.
Afterward, twist the colors together gently to make the lines of colors less harsh. You can then use a glossy top coat to make sure that all of the colors and colors transitions remain sealed and protected. Whether you prefer a beachy finish or abstract art, there’s something for everyone to try. have You can have fun trying out different shapes, colors, and techniques. The opportunities are vast, allowing you to create beautiful nail art that you can be proud of. So get it started.